Tuesday, December 31, 2013

What can you do with a Slhouette Cameo?

I must have done something right, because there was a brand new Silhouette Cameo under the tree for me this year and I had NO IDEA it might EVEN show up!

I was so excited that I took it out of the box right away, and plugged it in just a couple of days later :).

I wanted to see what this baby would do so I just started trying things out.

1. Would it cut vellum?
Yes it would! Intricately as well!

2. Is print to cut easy to master?
Why yes, it is, look how awesome that looks!!

3. Can it cut both Glitter as well as Regular cardstock?
Yes! I can make one of those awesome Putz-Style houses that Samantha Walker designed and put up on the Silhouette store for sale. (I had purchased these houses as fast as she put them out, and was going to make them before Christmas with my original Silhouette machine, but alas I ran out of time... I just had to make one though it's so cute. Here it is on my tree (yes, it's still up right now).
The glitter paper here is American Crafts POW! (um, I am loving that stuff!) The trim is cut out of metallic silver Bazzill and the snow is white Bazzill. I covered the whole house with Distress Stickles in Rock Candy and had some Vellum with doilies on it that I have no idea how old it is... it's by K and Company and has been in my stash for several years. But I put that behind the windows. The stickles made my icicles bow out a bit, but for my first complex 3d project I am overjoyed !!!

4. Will it cut Vinyl?
5.Will it cut Canvas?

Why yes, it will. The Vinyl does NOT need a cutting mat, and the machine has it's own vinyl settings that I used and it worked perfectly. I cut the elf shape above from that weird sheet of vinyl that I had just in my stash from forever ago. The tag and the butterfly are both cut out of Claudine Helmuth's stickyback canvas. If you are cutting this material you DO need your cutting mat and I suggest double cutting for best results. My butterfly is cut cleaner than the tag. I used the method of transferring paper my friend Christine posted here to transfer the stripy paper to my tag, then I covered it in Corvette Red Dimensional Crystal by Art Anthology. Then when it was dry I peeled my elf shape from my vinyl and stuck it on the prepped tag. This is going on a late to mail xmas gift
Oh, here it is on the gift which is inside a 3d purse box that I also cut with my awesome new toy :)


6. Will it cut chipboard?
The answer is actually yes, it will cut thin chipboard with no problem at all!
This was some Recollections brand chipboard that I picked up at Michaels one time when they had their loose leaf paper on sale. The chipboard was included so I got several sheets, they were in with the 12x12 scrapbook paper. 
I have some Graphix chipboard which is really thick, I could NOT get it to cut that, but boy I tried :)

I don't have any of their special materials like their vinyl, the vinyl I have came from Vinyl Superstore. I also have some metallic cardstock but I haven't tried it yet. I will keep you posted. 

OH in case I haven't mentioned it I took a beginner class from Kerri Bradford now that I have upgraded to a Cameo, there are more classes there that I want to take, but if you are having any sort of issues starting out, I can't recommend her beginning class enough! Also she gives you some shapes. 

I can't wait for my New Year's day off, and I kind of can't believe that I have been pushing this machine so hard to see exactly what it can do. I've been having SO MUCH FUN!!!

TFL!
(the printed cardstock is from the Studio Calico Magical collection paper pad)


Saturday, December 28, 2013

Get Well Soon!

I don't make many get well cards and I take that as a good sign, that I don't know many people who are ill long enough to get a card. But I needed one recently and got busy with some Cosmo Cricket, Thickers and misc stuff lying around on my table... speaking of which I'm currently trying to clean off my dining room table, it's shameful how much stuff I have strown out over the top of it :).


I think it turned out lovely! I love the pink!! 

Saturday, December 21, 2013

Christmas Cards 2014 Part 5

Are you sick of them yet? These two are my favorite... um well they all are but I love these two especially for their non traditional ness.

I purchased the Cosmo Cricket Creative Girl 8x8 pad and the Simple Surfaces 12x12 pad a while back and really have been pulling them out and telling myself I didn't have a project worthy of their lovliness... um, yeah I'm trying hard not to just pet and hoard some paper :).

I used a fiskars paper punch to punch those scallopped circles and threw on some navy twine and an old metal Making Memories sentiment and there it was. I LOVE IT!

This one features some really old alphas from CC, those pink woodgrain and the aqua blue ones. I'm almost out of my gray foam lullaby font thickers, and new was the only word I could make work with Holiday Traditions.

The twine and sequins came from Endless Inkabilities.

Really love the non traditional looks!


Thursday, December 19, 2013

Christmas Cards 2013, the sick and the twisted...

I was shown a "funny" a cartoon from the paper that made me laugh so hard I cried... and I turned it into some sick and twisted Christmas Cards for a few I think will appreciate it as well. I copied the cartoon on my printer then printed it out on white cardstock. Then I used some distress inks to watercolor in the image that was just in black and white. The cards are very simple, a couple of sheets of the Studio Calico Magical Christmas paper line and some trim and I'm done.


I hope they made you smile! Remember to look everywhere for ideas and inspiration!

Tuesday, December 17, 2013

Christmas Cards 2013 part 4

This is a card that I made especially for someone... I'm not saying who. :)

I used paper from the Studio Calico Magical Collection and stamps from Lawn Fawn, three sets... Yeti Set Go and Critters in the Forest, Hats off to you. I had this idea for a tie dye christmas tree for a few days, this one is colored with different colors of glimmer mist. After painting on the mist, I took a copic marker and colored the base, my yeti is painted with mist as well. I used Distress Stickles in Rock Candy to glitterize the tree and the Santa hat. I LOVE IT! Those letter stickers are from October Afternoon, the black paper is stamped with snowflakes from Yeti Set Go and the music paper is glimmermisted and misc from my stash. 

Thanks for looking :)

Saturday, December 14, 2013

Christmas Cards 2013 Part 3

I decided I wanted to make a few cards with the leftover piece I had from cutting out those triangles (because all the card bases I have now are Ivory and this was the year of trying to use up my stuff). I took the Triangle Stencil and some Distress Paint in Tarnished Brass (and this is messy and inexact btw) and stencilled (is that a word?) six triangles on the front of my card. I purchased this ADORABLE Reindeer from the Silhouette Store I sized it down and cut him out of some lovely silver colored Bazzill cardstock (I think it's the Bazzill Bling but I've had it forever). Then I took some of that lovely string from EndlessInkabilities and tied it around the neck of my deer like a cute little scarf, used popdots to apply the deer to the card and TA-DA! A few more cards ready to go.


Thursday, December 12, 2013

Christmas Cards 2013 Part 2

I actually made these cards first, and sadly I only had three Kraft card bases left in my stash because I LOVE these and I'm trying to be good (are you listening Santa?) and use what I have, so I just made these for the Kraft Card Bases that I had. I used String that I won from Scrapbook Circle that came from EndlessInkabilities Etsy shop (she has some really cool stuff, check her out!). I used my trusty Silhouette and created my own little triangle shapes to wrap string around in various colors. I used the Let it Snow stamp set from Lawn Fawn for the greeting and came up with this:


Simple and beautiful!


Tuesday, December 10, 2013

Christmas Cards 2013

I generally like to have my Christmas cards made early (if I'm making them). I didn't make it this year... but since I need some kind of count in the twenties and I needed them quickly I decided to come up with some ways to make them faster and get them finished. I had purchased the Studio Calico Holiday collection because I didn't have any Christmas paper and it was available locally and I could go ahead and make my cards. This was before Thanksgiving and I still didn't get them made early like I thought I would, LOL. But I do really like this collection. So yesterday I decided to take a cue from Shimelle Laine. She has talked about cutting up her papers into sizes that she uses (she never measures btw and that is so refreshing to me because well, I don't measure a lot myself) and just has a pile of pre-cut papers that she can use. So I pullout out some patterns from this collection that I liked and thought would work well together and hacked away until I had three piles of papers. I punched a few of the peppermint circles out but then my punch decided it wasn't going to work anymore so I gave up on that for the meantime and started just slapping papers together onto premade cards to see what I thought looked pretty. I made ten cards in just a few minutes and you know what, they look fine. They are handcrafted and I'm happy with them. I just Cut out some tags and embossed a sentiment Here they are...


Saturday, December 7, 2013

Entry for the Lawn Fawn 2014 Catalog Contest


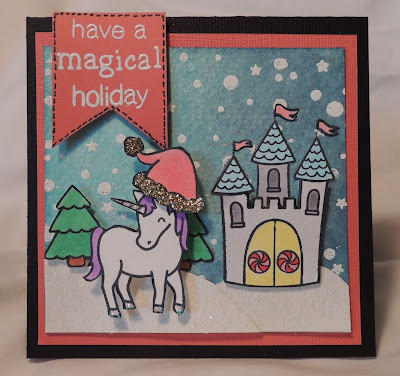
I really love Lawn Fawn... they make the cutest stamps. I got out all my fawny stamps to make a card and at first I wasn't going to make a Christmas card... but then had the CUTEST idea... so I took a piece of watercolor paper and my favorite snowy background stamp from Let it Snow. I heat embossed the background with white embossing powder then used Broken China, Faded Jeans and Peacock Feathers distress inks to make my evening sky. Then I sprayed the whole thing with Perfect Pearl Mist in Perfect Pearl. I cut two pieces of the watercolor paper and sprayed them with the same mist to use as snowbanks. Then I laid these aside to dry. I stamped out the castle from Critters Ever After a couple of times after masking off the door pulls so that I could use some candy treats from Sweet Christmas in their place. I stamped the unicorn from Critters Ever After and the trees from Sweet Christmas and the Santa hat from Hats off to You. The sentiment is partially from Sweet Christmas (um, yes I cut one apart, it's ok, it still stamps). And I used Smitty's ABC's to spell out magical. I used white embossing powder for my sentiment and colored in all the images with copic markers. I added two layers of Distress Stickles in Clear Rock Candy over the snowbanks when the Perfect Pearls mist was dry. Then one layer over both trees. I used Gold Stickles on the Santa Hat. I used pop dots between castle layers and the tree on the left. I used multiple layers on the unicorn because I LOVE that little guy and wanted him to stand out! I also used Crystal colored stickles on the horn and hooves because, I can... and I think it makes my unicorn more magical.

And for a better photo...


Thursday, December 5, 2013

Holiday Happenings...

So I'm now officially behind on making Christmas Cards. I made a few during the summer.


And... I stopped right there ;)

I have been working with my Silhouette for HOURS this evening and have nothing but a couple of little stars to show for it. I ordered a couple of mats Monday while they have a BIG SALE with FREE SHIPPING going on (it'll be going on for a few days yet... go over if you need anything...) and they aren't here yet. So I have been unsuccessful in cutting out this ADORABLE house that I pinned from Samantha Walker and she put out a new one today and will probably be putting out more this week so EEK I want them all!! SO CUTE!! 

Ok, so check out those cut files, they are on sale too! Let me know what you are working on and check out my Santa Sack Haul :


Tuesday, December 3, 2013

It's a Wonderful Life Tag

I moved to the Northern Virginia area just over one year ago and I MISS my group of scrappy ladies that I used to get together and crop with. They have been having some swaps that I haven't been participating in, but when they announced a Christmas Tag Swap I went "I WANT IN!" ;)

I had some things that have been in my stash a long time, some glittery papers that I bought when they were on clearance and a jacket I've used before to make a mask, some burlap just hanging out, charms, ribbon, etc...

I used my Tim Holtz Tag die to cut out twelve tags from this old creative imaginations glitter paper, sprayed over with a stencil of dots with Gold Lame' colorshine mist and added ruffles made from misted vintage pattern paper, leaves from burlap and the lining of the velvet jacket that I cut up to make pointsettas out of. I raided my button stash for flower centers.

I used this tutorial to make my pointsettia.


I kept adding things thinking that I needed to add more... they were looking so victorian... I found some cameos in my stash from a few years ago. 


I was agonizing over just that touch of something extra... did I need a stamp or a banner or what... nothing in my stash seemed to fit the bill and I kept wishing I had already taken the Kerri Bradford class that I bought months ago to be able to use the silhouette that my friend had traded to me last year before I moved here (she had upgraded to a cameo and I traded her a comfy chair).

So, I started watching the class videos. And I decided to add a charm and cut out a sentiment and colorize it with Mr. Huey's and Colorshine. This was the end result:

I am SO PROUD of these tags! I hope the ladies in the swap LOVE them as much as I do! They got mailed out as soon as they were dry. (the sentiment says It's a Wonderful Life which is my FAVORITE movie of all time)

Hugs all!